A hybrid approach for procedural planets
Part I - Mercator generation
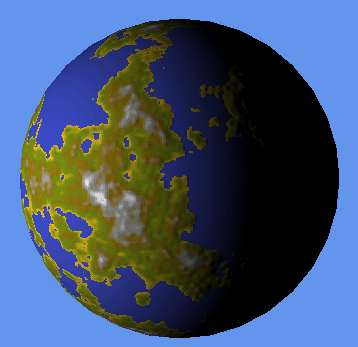
Preview
The holy grail for rendering planets is a single shader that generates all the terrain, lights it, textures it, and displays it.
Sadly we are not there yet. At the moment we do not have read/write textures in the GPU, so we have to fetch the generated data back into ram for additional processing. We can do a lot of the processing in the GPU though, which is why this is described as a hybrid technique.
Traditional techniques for generating terrain use fractal systems, a common and very effective system is mid-point displacement. The disadvantage of this type of technique is that it requires access to the entire array when generating data. This makes it impractical to implement as a shader. So we are going to use a noise function to generate our terrain, which can be implemented as a shader.
Desired results
- GPU generated terrain
- Multiple planet types
- Atmospheric effects
- Cloud layer
Target audience
This is intended for people who are competent XNA coders, I will gloss over many things which I consider to be standard code. I will however supply full source code so you can cut and paste to your hearts content. The end result will be a set of classes that can be easily re-used in your own code. However these routines are very much experimental, I would not call them production quality. They will however be an excellent starting point for your own code.
Base class
Before we can start building planets, we need to know some information about them. I hold this data in a base class which we will build on as we go along. At the moment we don't need a lot of data, just a type and seed. I am going to be considering five planet types which should cover most of planets in our universe. I also need two textures the perm texture and the generated terrain, or mercator.
using System;
using System.Collections.Generic;
using System.Linq;
using Microsoft.Xna.Framework;
using Microsoft.Xna.Framework.Audio;
using Microsoft.Xna.Framework.Content;
using Microsoft.Xna.Framework.GamerServices;
using Microsoft.Xna.Framework.Graphics;
using Microsoft.Xna.Framework.Input;
using Microsoft.Xna.Framework.Media;
using Microsoft.Xna.Framework.Net;
using Microsoft.Xna.Framework.Storage;

namespace PlanetTutorial
{
    public enum PlanetType
    {
        Ice,
        Water,
        Rock,
        Gas,
        Molten,
    };
    public abstract class Planet
    {
        public int Seed;
        public PlanetType Type;
        public Texture2D PermTex;
        public Texture2D Mercator;
        public Effect terrain;
    }
} |
PermTex
As yet we don't have a random number generator in the GPU, so we have to cheat. We generate a random array of numbers, based on the planets seed, and store this in a texture that we pass into our shader. It's very simple to do.
public void BuildPerm(GraphicsDevice graf)
{
    float[] map = new float[256];
    Random r = new Random(Seed);
    Vector4[] perm = new Vector4[256 * 256];
    int index = 0;
    for (int y = 0; y < 256; y++)
    {
        for (int i = 0; i < 256; i++)
        {
            Vector4 a = new Vector4();
            a.X = (float)((r.NextDouble()));
            a.Y = (float)((r.NextDouble()));
            a.Z = (float)((r.NextDouble()));
            a.W = 1;
            a.Normalize();
            perm[index] = a;
            index++;
        }
    }
    for (int i = 0; i < 256; i++)
    {
        map[i] = ((float)i) / 256.0f;
    }
    for (int i = 0; i < 256; i++)
    {
        int k = r.Next(255);
        float l = map[k];
        map[k] = map[i];
        map[i] = l;
    }
    for (int i = 0;  i< 256; i++)
    {
        perm[i].W =  map[i];
    }
    PermTex = new Texture2D(graf, 256, 256, 1, TextureUsage.None, SurfaceFormat.Vector4);
    PermTex.SetData(perm);
} |
This will produce a texture something like this.

Noise
The heart of our system is a noise generator. You can spend your entire lifetime playing with noise functions, there are lots to choose from. After a lot of experimentation I have ended up using simplex noise. It has a structure that produces results I really like, but of course you can use Perlin or anything else you like. The noise function is implemented in the shader.
The noise function takes a 3D vector as it's input, so in our case we can feed in the world position as the input to the noise function. This means that we can just throw a 3D mesh of a sphere at the shader and it will give us a mercator map. Perfect.
However we have to store the result in a texture, it is a pity we need to do this, but if we don't we cannot apply bump mapping etc to the generated terrain. So we have a problem, if we want the world position for the noise function, how are we going to place the generated height in the correct spot in the texture? Again, we cheat. We apply a simple spherical UV map to our sphere and in the vertex shader we use the tex coords as display coords (okay we need a bit of fiddling with them, but you take my point)
We are going to generate shaders for each planet, so this is what we end up with for the water planets.
#define ONE 0.00390625
#define ONEHALF 0.001953125

float xOvercast=1.1;

texture ColorMap;
sampler ColorMapSampler = sampler_state
{
    texture = ;
    magfilter = LINEAR;
    minfilter = LINEAR;
    mipfilter = LINEAR;
    AddressU = WRAP;
    AddressV = WRAP;
};

//======================================================================================
//=
//=
//=
//======================================================================================
struct VS_IN
{
    float4 Position : POSITION;
    float2 TexCoord : TEXCOORD0;
};
    struct VS_OUT
{
    float4 Position : POSITION;
    float3 WP : TEXCOORD3;
};

struct PS_OUT
{
    float4 Color : COLOR;
};

//======================================================================================
//=
//=
//=
//======================================================================================

VS_OUT VS_ColorMap(VS_IN input)
{
    VS_OUT output = (VS_OUT)0;

    output.Position.x=(input.TexCoord.x*2)-1;
    output.Position.y=(input.TexCoord.y*2)-1;
    output.Position.z=1;
    output.Position.w=1;

    output.WP = input.Position;
    return output;
}

float fade(float t)
{
    return t*t*t*(t*(t*6.0-15.0)+10.0);
}

float3 simplex0( float3 P)
{
    float3 offset0;

    float2 isX = step(P.yz, P.xx); // P.x >= P.y ? 1.0 : 0.0;  P.x >= P.z ? 1.0 : 0.0;
    offset0.x  = dot(isX, float2(1.0, 1.0)); // Accumulate all P.x >= other channels in offset.x
    offset0.yz = 1.0 - isX; // Accumulate all P.x <  other channels in offset.yz

    float isY = step( P.z, P.y ); // P.y >= P.z ? 1.0 : 0.0;
    offset0.y += isY; // Accumulate P.y >= P.z in offset.y
    offset0.z += 1.0 - isY; // Accumulate P.y <  P.z in offset.z

    return offset0;
}
float3 simplex1(float3 offset0)
{
    return clamp( --offset0, 0.0, 1.0 );
}
float3 simplex2(float3 offset0)
{
    return clamp(offset0, 0.0, 1.0 );
}

//======================================================================================
//=
//=  3D simplex noise. Comparable in speed to classic noise, better looking.
//=
//======================================================================================
float snoise(float3 P)
{

// The skewing and unskewing factors are much simpler for the 3D case
#define F3 0.333333333333
#define G3 0.166666666667

    // Skew the (x,y,z) space to determine which cell of 6 simplices we're in
    float s = (P.x + P.y + P.z) * F3; // Factor for 3D skewing
    float3 Pi = floor(P + s);
    float t = (Pi.x + Pi.y + Pi.z) * G3;
    float3 P0 = Pi - t; // Unskew the cell origin back to (x,y,z) space
    Pi = Pi * ONE + ONEHALF; // Integer part, scaled and offset for texture lookup

    float3 Pf0 = P - P0;  // The x,y distances from the cell origin

    // For the 3D case, the simplex shape is a slightly irregular tetrahedron.
    // To find out which of the six possible tetrahedra we're in, we need to
    // determine the magnitude ordering of x, y and z components of Pf0.
    float3 o1;
    float3 o2;
    float3 o0;

    o0=simplex0(Pf0);
    o1=simplex1(o0);
    o2=simplex2(o0);

    // Noise contribution from simplex origin
    float perm0 = tex2D(ColorMapSampler, Pi.xy).a;
    float3 grad0 = tex2D(ColorMapSampler, float2(perm0, Pi.z)).rgb * 4.0 - 1.0;
    float t0 = 0.6 - dot(Pf0, Pf0);
    float n0;
    if (t0 < 0.0) n0 = 0.0;
    else
    {
        t0 *= t0;
        n0 = t0 * t0 * dot(grad0, Pf0);
    }

    // Noise contribution from second corner
    float3 Pf1 = Pf0 - o1 + G3;
    float perm1 = tex2D(ColorMapSampler, Pi.xy + o1.xy*ONE).a;
    float3  grad1 = tex2D(ColorMapSampler, float2(perm1, Pi.z + o1.z*ONE)).rgb * 4.0 - 1.0;
    float t1 = 0.6 - dot(Pf1, Pf1);
    float n1;
    if (t1 < 0.0) n1 = 0.0;
    else
    {
        t1 *= t1;
        n1 = t1 * t1 * dot(grad1, Pf1);
    }

    // Noise contribution from third corner
    float3 Pf2 = Pf0 - o2 + 2.0 * G3;
    float perm2 = tex2D(ColorMapSampler, Pi.xy + o2.xy*ONE).a;
    float3  grad2 = tex2D(ColorMapSampler, float2(perm2, Pi.z + o2.z*ONE)).rgb * 4.0 - 1.0;
    float t2 = 0.6 - dot(Pf2, Pf2);
    float n2;
    if (t2 < 0.0) n2 = 0.0;
    else
    {
        t2 *= t2;
        n2 = t2 * t2 * dot(grad2, Pf2);
    }

    // Noise contribution from last corner
    float3 Pf3 = Pf0 - float3(1.0-3.0*G3,1.0-3.0*G3,1.0-3.0*G3);
    float perm3 = tex2D(ColorMapSampler, Pi.xy + float2(ONE, ONE)).a;
    float3 grad3 = tex2D(ColorMapSampler, float2(perm3, Pi.z + ONE)).rgb * 4.0 - 1.0;
    float t3 = 0.6 - dot(Pf3, Pf3);
    float n3;
    if(t3 < 0.0) n3 = 0.0;
    else
    {
        t3 *= t3;
        n3 = t3 * t3 * dot(grad3, Pf3);
    }

    // Sum up and scale the result to cover the range [-1,1]
    return 32.0 * (n0 + n1 + n2 + n3);
}


PS_OUT PS_ColorMap(VS_OUT input)
{
    PS_OUT output = (PS_OUT)0;

    float amp=2;
    float freq=1;
    float y=0;
    for (int i= 0;i<4; i++)
    {
        freq = (2*pow(2,i))-1;
        amp=pow(0.5,i);
        y+=snoise(input.WP*freq)*amp;
    }

    y=(y+1)/2;
    y = 1.0f-pow(y, xOvercast)*2.0f;

    output.Color =  float4(y.x,y.x,y.x,1);

    return output;
}

technique ColorMap
{
    pass Pass0
    {
        VertexShader = compile vs_2_0 VS_ColorMap();
        PixelShader = compile ps_3_0 PS_ColorMap();
    }
} |
Okay that is a huge chunk of code to digest, but the key points to look at are the vertex and pixel shader. In the vertex shader I trick the GPU into rendering my point at the correct place in the texture, and pass the input world position through to the pixel shader.
In the pixel shader I call the noise function to generate a height value, then scale it. The xOvercast variable just gives you a way of controlling the amount of water on the planet and is included for later use. Play around with this function, it's set up the way I want it but that doesn't mean it's perfect for you.
In the pixel shader I call the noise function to generate a height value, then scale it. The xOvercast variable just gives you a way of controlling the amount of water on the planet and is included for later use. Play around with this function, it's set up the way I want it but that doesn't mean it's perfect for you.
Using the shader
First thing to do is create a class WaterPlanet that has Planet as it's base class. To this we need to add a block of code to load the effect file. At the same time we may as well generate the terrain, so we will need a few things. We are going to have to render the terrain to a texture, I have encapsulated the code for that into a class RenderTargetState which is in the supplied source, so we need to create a copy of that and begin rendering to the texture. Then we need a sphere to draw. I have one defined as a static variable in Game1.cs and loaded from a file. So our new class looks like this.
using System;
using System.Collections.Generic;
using System.Linq;
using Microsoft.Xna.Framework;
using Microsoft.Xna.Framework.Audio;
using Microsoft.Xna.Framework.Content;
using Microsoft.Xna.Framework.GamerServices;
using Microsoft.Xna.Framework.Graphics;
using Microsoft.Xna.Framework.Input;
using Microsoft.Xna.Framework.Media;
using Microsoft.Xna.Framework.Net;
using Microsoft.Xna.Framework.Storage;

namespace PlanetTutorial
{
    public class  WaterPlanet:Planet
    {

        GraphicsDevice graphics;

        public WaterPlanet(GraphicsDevice graf)
        {
            Type = PlanetType.Water;
            BuildPerm(graf);
            graphics = graf;
        }

        public void LoadContent(ContentManager cont)
        {
            terrain = cont.Load<Effect>("Shaders/Water");
            Generate(graphics);

        }
    }
} |
Now we need to add a RenderTargetState to the base class and write the Generate function. So we add this code to the base class.
public RenderTargetState rts;

public void Generate(GraphicsDevice graphics)
{
    rts = new RenderTargetState(graphics, 512, 512, 512, 512);
    rts.BeginRenderToTexture();
    graphics.RenderState.DepthBufferEnable = false;
    graphics.RenderState.CullMode = CullMode.None;
    terrain.Parameters["ColorMap"].SetValue(PermTex);
    foreach (ModelMesh mesh in Game1.sphere.Meshes)
    {
        for (int i = 0; i < mesh.MeshParts.Count; i++)
        {
            // Set this MeshParts effect (currentEffect) to the
            // desired effect (from .fx file)
            mesh.MeshParts[i].Effect = terrain;
        }

        mesh.Draw();
    }
    Mercator = rts.EndRenderGetTexture();
    rts.DestroyBuffers();
    rts = null;
} |
The end result of all that code is something like this.
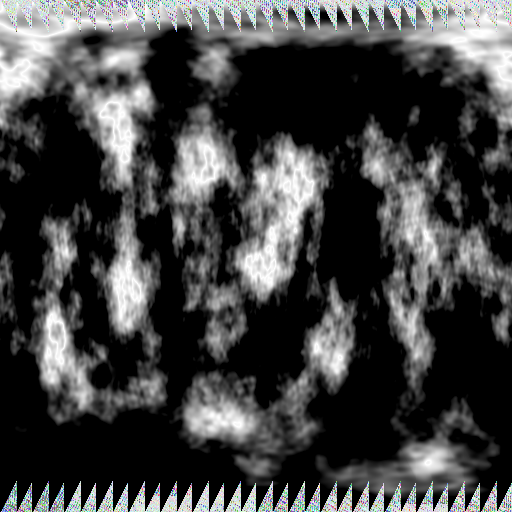
Interesting, but not very planet like. So now we need to display it. To convert the mercator map into a planet like terrain, the first step is to colourise the height map. To do this I use a small texture. You could use a 1D texture, but I use a 2D one. The reason for this is that I can supply an extra parameter later which forms the X coordinate of the texture lookup. This will be based on the atmosphere of the planet and take care of atmospheric absorbtion of light by the atmosphere, but for now lets just use something like this.

Y=0 is at the top (water) and Y=1 is at the bottom (ice). We will need a shader to display the planet, for now we just need a shader that takes the mercator and color map and displays it. We might as well add some lighting at this point.
float4x4 wvp : WorldViewProjection;
float4x4 world : World;
float AmbientIntensity = 1;
float4 AmbientColor : AMBIENT = float4(0,0,0,1);
float3 LightDirection : Direction = float3(1,0,1);
texture Palette;
sampler PallSampler = sampler_state
{
texture = |
The final stage for this part of the tutorial is to draw the planet. So we add the following code to the planet base class along with a bit of code to load the new effect. The effect is loaded in the WaterPlanet classes LoadContent method.
public void Draw(Matrix View, Matrix World, Matrix Projection)
{
    Matrix wvp =  World * View * Projection;
    draw.Parameters["wvp"].SetValue(wvp);
    draw.Parameters["Palette"].SetValue(Palette);
    draw.Parameters["ColorMap"].SetValue(Mercator);
    draw.Parameters["world"].SetValue(World);
    for (int pass = 0; pass < draw.CurrentTechnique.Passes.Count; pass++)
    {
        for (int msh = 0; msh < Game1.sphere.Meshes.Count; msh++)
        {
            ModelMesh mesh = Game1.sphere.Meshes[msh];
            for (int prt = 0; prt < mesh.MeshParts.Count; prt++)
                mesh.MeshParts[prt].Effect = draw;
            mesh.Draw();
        }
    }
} |
Hey presto you should have something like this...
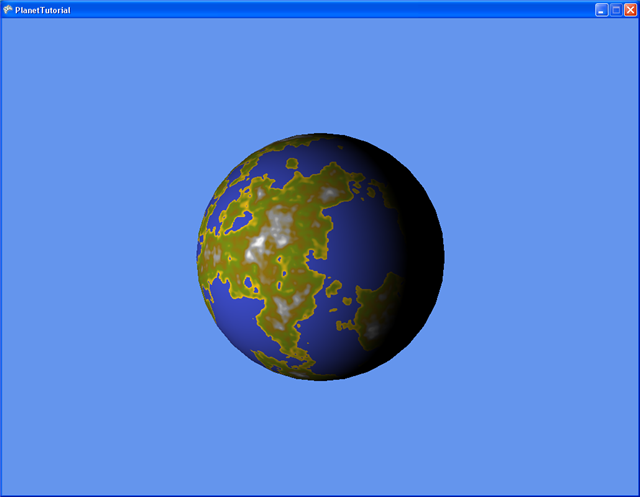
Not a bad start.
In the next part of the tutorial we will cover bump mapping your planet, but for now here is a link to the complete source for this section. Have fun.
Next part of the tutorial
In the next part of the tutorial we will cover bump mapping your planet, but for now here is a link to the complete source for this section. Have fun.
Next part of the tutorial
