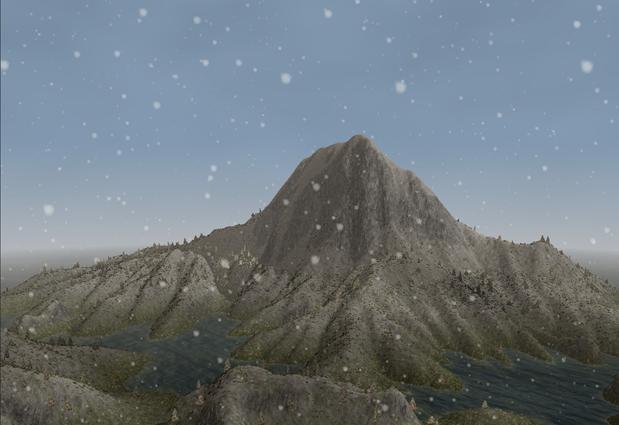
Realistic and Efficient Particle Weather Effects:
Rain and Snow
by Justin Stoecker
Introduction
For many games, the inclusion of weather effects is an afterthought or given little attention. While doing research for a project, I realized there was very little information on how best to create common weather phenomena such as rain or snow. This article demonstrates an efficient and visually pleasing approach to modeling precipitation effects. Before introducing this technique, I’ll begin by providing brief examples of a two other techniques I’ve noticed and their drawbacks.
Technique 1: Texturing the Screen
Probably the easiest and quickest way to create the illusion of weather, this technique involves drawing a texture onto the screen and having it scroll. The illusion of depth can be achieved by having a few layers of rain streaks with varying scales.
Problems:
For a 2D game, this is a good choice and inexpensive to render. However, one issue is that care must be taken to ensure that the textures tile properly; even properly tiled textures can easily lead to repetitive patterns. For a 3D game, it’s easy to notice the trickery behind this approach and the result will appear cheap and lazy. There are, however, some more sophisticated variations on this technique. I came across an in-depth GDC presentation strictly on rain here: http://ati.amd.com/developer/gdc/2006/GDC06-Advanced_D3D_Tutorial_Day-Tatarchuk-Rain.pdf
Technique 2: Particle Systems
Particle systems are very popular and can create a variety of interesting effects. A particle is a simple textured object in 3D space (usually a point sprite or billboard) that has a limited duration. Each particle is usually generated from an emitter (barrel of a gun, the ceiling of a skybox, etc.), has forces act upon it (gravity, wind), and then expires after some set time.
There are several variations on particle system implementations, but most modern ones use the same basic steps: the CPU manages the creation and replacement of particles; the GPU updates and renders active particles. While CPU-only particle systems are easier to make, the involvement of the GPU is essential to maintaining large numbers of particles.
Problems:
Determining where to create weather particles can be a bit tricky. One approach is creating particles over all outdoor portions of the map; this is highly inefficient, and a game that is primarily outdoors will quickly run out of memory storing all these particles. A better approach, common in modern games, is generating particles around the camera. The issue that arises with this resembles cartoons where a rain cloud follows a character around, but takes a second to catch up when the character moves. If your camera is zipping through the world, there won’t be any raindrops or snowflakes appearing for a second or two!
Another issue worth mentioning is maintaining the system. If you want really heavy rain, you’ll frequently need to update the vertex buffer that holds the particle data. The more particles, the worse this gets.
A Different Approach
The technique I present is a spin on a standard particle system that results in weather that is three-dimensional, extremely efficient, and aesthetically satisfying. In addition, absolutely no work is required of the CPU for maintaining the effects, and the issue with particles lagging behind the camera is resolved. In a nutshell, this method involves four groups of particles that never expire, with each particle using a series of simple parametric equations. Instead of presenting a wall of code, I’m going to explain how this technique works in principle. You can find further comments in the source code.
Particle Movement
There are some simple observations that hold true for both rain and snow: they form in the sky, fall due to gravity, and finally dissipate when hitting the ground. For simplicity, we assume that raindrops and snowflakes reach constant acceleration by the time we see them. The most trivial equation that represents our falling particle’s height:
y = y0 + t * velocity.y
If this equation is used, our particle will reach the floor of our world and continue on to become increasingly negative. We could throw our particle away once it hits the floor and supply a new one, but why not just reset its position to the height (or ceiling) of our world?
y = height + (y0 + t * velocity.y) % height;
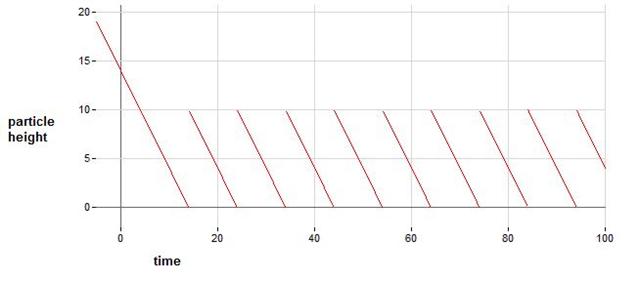
Ceiling height = 10, velocity = (0,-1,0), y0 = 4
This equation will keep our particle’s height within (0,height] when t >= y0. The initial values outside our range can be avoided by using (height + (y0 + t * velocity.y) % height) % height instead, but t should be large enough by the time the game loads to never notice it. This saves an extra operation on all the particles. With
this function, all we have to do is supply an initial set of particle
positions and update the time parameter; each particle will fall until
it hits 0, then “reset” to the maximum ceiling height.
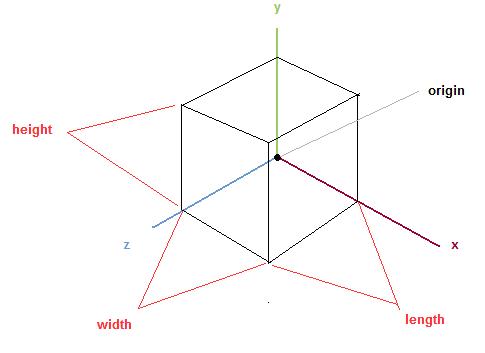
While this already might pass as rainfall, I find it a bit boring that the particles fall straight down. We need to add some horizontal displacement, such as wind, but we have to be careful not to let our particles fly off the map. To start, we define an area that our particles must be contained in: a box defined by its origin, width, height, and length is easy. I’ll call this a weather region.
While this already might pass as rainfall, I find it a bit boring that the particles fall straight down. We need to add some horizontal displacement, such as wind, but we have to be careful not to let our particles fly off the map. To start, we define an area that our particles must be contained in: a box defined by its origin, width, height, and length is easy. I’ll call this a weather region.
Adding Horizontal Displacement
To displace our particles horizontally, we’ll use the same exact same approach used to make them fall. We’ll also modify the previous equation to take into account the origin. Our wind effects are provided by velocity.x and velocity.z, and when a particular component of the velocity is positive, there is a simplified version of the equation. Here is how the x-coordinate of the particle is computed:
x = origin.x + (x0 + t * velocity.x) % width // if velocity.x >= 0
x = origin.x + width - (x0 - t * velocity.x) % width // if velocity.x < 0
The same is done for the z-component, and the previous equation used for the y-component as the origin.y added to it. Our particles will now be able to fall and move horizontally while remaining inside the region.
Even with the wind, our particles’ paths are still parallel lines. For rain, this can be done by adjusting the x and z components of the velocity slightly for each particle. Each rain particle is provided with a random scale, so the following change will exaggerate horizontal displacement for shorter raindrops:
velocity.xz /= scale.y
Snow, on the other hand, should not fall in straight lines at all. Being rather light, snowflakes tend to float around a bit. To add a nice drift, the cosine (or sine) functions will produce a smooth offset. Snow particles come with two random numbers so each has a unique drift, and the turbulence parameter simply scales the amount of drift:
x += cos(t – random1) * turbulence
z += cos(t – random2) * turbulence
Infinite Weather
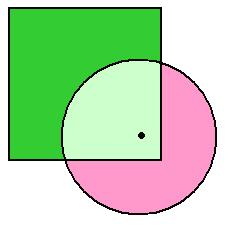
Up to this point, I’ve explained how to create a region that contains a bunch of snow or rain particles. We could make this box really huge with millions of particles to cover our entire world, but I already mentioned why that’s not really feasible. How do we cover our map with particles, then? Let’s say our camera can only see particles up to a certain distance, d, and our weather region has width and height 2d.
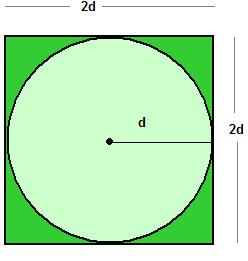
In the graphic above, the rectangle represents the base of a weather region. The
black dot in the center is our camera position, and the circle in green
represents the area of particles visible to our camera. When
the camera is in the center of the weather region, all is well; if we
move the camera away from the center there are particles missing where
we want to see some:
If we create four
weather regions instead of one, we now have particles visible when the
camera is inside the center area of the four regions:
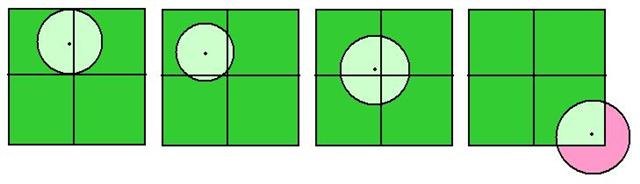
The problem still exists outside the center area, however, as shown in the fourth image.
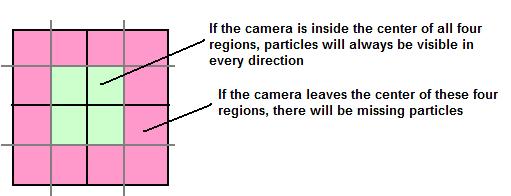
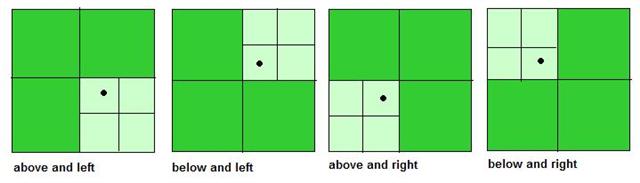
If we designate the region that contains the camera as the current region, we have three other adjacent regions. The
goal is to have our adjacent regions always positioned such that the
camera never sees a gap; we can only see a gap when the camera crosses a
line through its current region’s center!
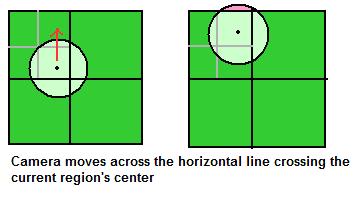
Of course, if we cross a
center line we also no longer see the particles in the region opposite
the direction of the camera’s movement, because they are at least d units away. In the above example, the particles in the bottom two regions are too far away to see. This would be the case even if the camera was sitting exactly on top of the current region’s center. That’s
the key to this technique: when crossing the center of the current
region, two of the four regions can be moved without noticing anything
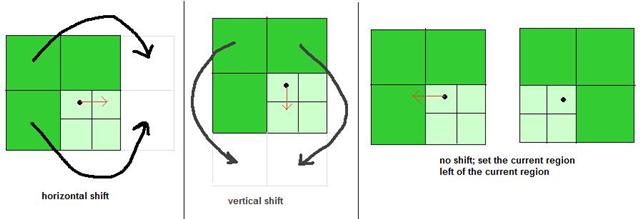
since their particles aren’t visible. You can always position the three adjacent regions in a way that covers any potential gaps. The camera can be in one of four possible configurations relative to the current region’s center:
Now that we know when we have to shift certain regions, we have to figure out which ones to move. There are only two possible ways to shift the regions: horizontally or vertically. Note
that if the camera leaves the current region, but not by crossing the
center, a shift is not necessary; instead, we only need to change the
current region to the one it enters.
So here’s the algorithm for updating our regions:
- Check if the camera has moved in the x or z direction
- Check if the camera has exited the current region
- Check each edge of the current region
- If crossed, change the current region to the region camera enters
- Update the state of the camera being above or below the current region’s center
- Check each edge of the current region
- Check if the camera has crossed the current region’s center
- Update the state of the camera being above or below the current region’s center
- Shift the regions that are too far away to see
- Update the state of the camera being above or below the current region’s center
- Check if the camera has exited the current region
You can find the code for how this works in the sample provided, with comments for the important classes. These core classes are all inside the weather folder, and the basic layout of the classes is as follows:
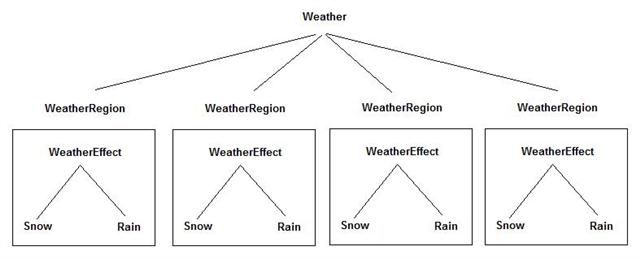
Weather.cs
is the master class that contains all of the weather regions, handles
the updating and shifting of the regions, and passes on the draw calls
to each region
WeatherRegion.cs is describes a region that has a weather effect associated with i
WeatherEffect.cs is an abstract class that describes a particle effect like rain or snow
Rain.cs andSnow.cs are types of weather effects
The HLSL shader files are Rain.fx and Snow.fx, and these both implement the particle movement described earlier.
Extending the Concept
Most applications have some sort of ceiling to the world, so we only check for movement in the x or z directions. If you want to remove this restriction, use 8 weather regions – another 4 that sit on top of the ones shown here. Then all you have to do is check for change in the camera position’s y-component and perform y-axis shifts.
